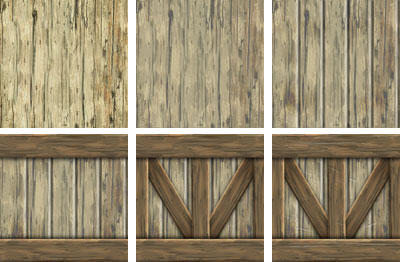
When I am working on a mesh, and I know that I will be creating several textures that will need to visually work together, I often start with the same base texture. In the above examples I start with a photograph of wood grain and soften it by running the
Cutout Filter on it in Photoshop.
Cutout turns photographic images into a more graphic image and has the effect of minimizing the contrast , giving a painterly quality to the image. I then add separations in the wood texture to suggest planks or individual boards. Next I copy and paste one of these boards to the top and bottom of my planks and darken them slightly. I repeat this to create the additional cross pieces, finally adding minor details and highlights to the surface to add interest and suggest the surface is weathered.

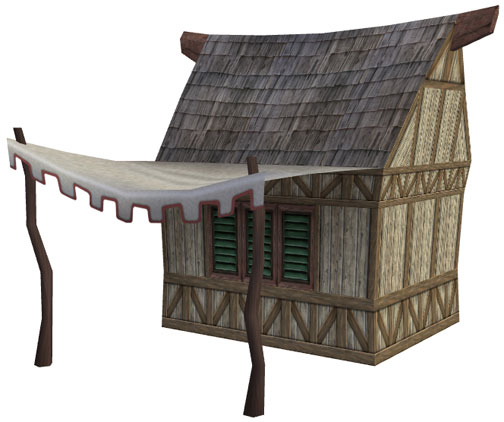
This technique allows me to build a variety of textures from the same base. Each of the above textures has it origin in my first Cutout wood grain texture. This also assures that there is a cohesive quality to all the textures, making my finished model look more believable.
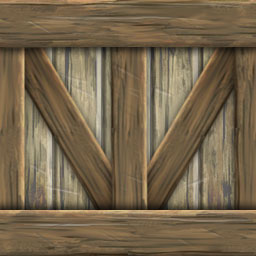
As I have said before, texture creation is often the most time consuming aspect of 3D model building. The quality of the textures applied to your mesh will determine the quality of the finished product. I often create master versions of each texture at twice the size of the eventual finished file, which is where I do all of my finer details. In this example I have added nicks and scratches to help break up the more linear edges and suggest age. I personally like a more impressionistic approach when I create textures and find they often suggest more detail then is actually there. ~Don
8 comments:
tips :) I have a couple of added tips if thats ok? For planks you can use the wood filter in Photoshop's eye candy filter set if you have it -it makes planks for you. If not, grab your digital camera an go for a nice walk :) Always try to make or find your own textures using filters or photos you have taken. Avoid the copyright trap and taking your own pics or making your own, gives you a groovey feelin' ! Love the tut by the way you guys have a way with summarising and yet still giving loads of info...nice work!
Great advice. I have never tried the Eye Candy filter set, I will do that right away. Grabbing your own textures is really satisfying. The other day I needed an image of a pile of laundry and hunted fruitlessly for something online. I had a "Doh!" moment, took my cell phone camera into my laundry room and seconds later I was ready to roll!
Yeah - Don's laundry room is a mess. You would think that the guy could complete his ONLY home duty. Jeez.
How did you add separations in the wood? Just curious. Texturing is my weak spot in regards to developing so I enjoy these.
Hi Stuzzy,
The trick I used to create the illusion of separations in a wood texture (making planks), is to create a layer over the wood texture and draw a straight line to represent each separation. In the case of the sample on this post, I then apply the Bevel and Emboss effect to the layer. In the control panel I set the Style to Outer Bevel, shading to around 176 degrees, Size to 6 pixels, and Soften to 2 pixels. You can play with these settings to get different effects. It's a quick trick but works really nicely.
Thank you for the reminder on the nicks and scratches. That's the step I'm always forgetting, as I'm concentrating too hard on getting the basic texture to look 'just so'. Then I put it all together and wonder why my rustic stuff looks 'pretty'. lol A bit of 'finishing' makes a huge difference.
Nicks, scratches, and highlights are the icing on the cake as far as I am concerned. It is also a way to draw attention to specific areas and away from others. In the end if you take a very impressionistic approach to texture creations you usually won't go wrong.
I was wondering if you had any tips on tiling and wood. Most meshes use a tiling function and I found that rather difficult to get my wood to line up. Especially real life wood. So the balance between it looking natural and it tiling. Tips?
-SiNafay
Post a Comment