Wednesday, May 14, 2008

Texture Tricks

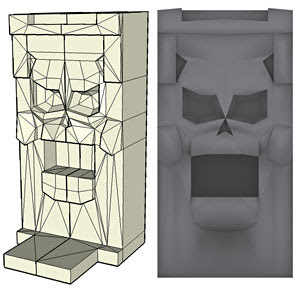
I have a bunch of tricks that I use to help me when I need to create dramatic textures. I used one such trick on a recent model I created, a Mayan inspired skull idol. I knew that I needed to create a texture that has to fit perfectly to the geometry I have built, so I will render a gray version of my untextured mesh first. To do this, I will set 3D Max to do a Light Tracer or Radiosity rendering. This will create an elevation with subtle bounce light on the surface and also suggest where the shadows might land. I then use this rendering as the under drawing for my texture paint.

In the above example you can see the rough 3D mesh, then next to it my front view render of the same model. In Photoshop I place the rendering (1) at the bottom of my Layers stack and start building up from there. Next, I start to draw out more details in black & white (2) using the render as a guide. I try to soften the hard edges and deepen some of the shadows. Next, I tint the black & white drawing (3) with just enough color to add interest to the surface. Lastly, I place a Multiply layer with a strong granite texture over the top of the entire image (4). I then play with the opacity percentage of the layer to allow the under drawing and texture to come through while remaining influenced by the organic texture on top. I also take the time to really push the shadows to suggest more depth than is actually built into the model itself.


The mesh has a very loose and theatrical quality to it. There is no reason to go photo realistic, and sometimes just suggesting detail is more than enough to get your point across. ~Don


PS - You might notice that the final model is a little less symmetrical than the rough model. I often distort, taper, or even squash my models after they are textured to give them a less "mathematical" appearance.


Tuesday, May 6, 2008

Adding Drama To Your Products

There are a lot of special tricks that you can use to give the illusion that your 3D models have more detail and drama than just what your geometry and applied textures will allow. Here is just one of them...

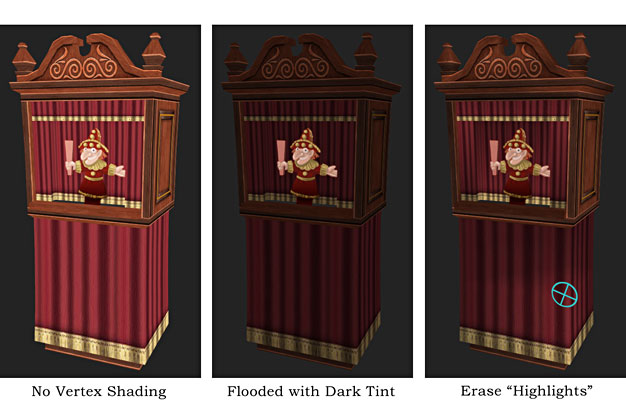
IMVU does not currently have a dynamic lighting system, so as content creaters we have to be a little cleaver about how we suggest mood and lighting in the products we create. One of my favorite tricks is to add depth to the surface of my models with Vertex Shading. Although the tool itself is a little like trying to decorate a cake with a hammer, this trick has given me some nice results.

In 3D Max I select the mesh I wish to shade and flood the entire surface with a darker tint. I then take the eraser tool and just ever so lightly pick out areas that help define the object's surface, allowing other areas to remain dark, and in the “shadows”. This trick does a nice job of turning an otherwise flat model into one with a little more theatrics. Still, it is possible to get a little too dark, so I suggest you take a light hand when shading your own creations.

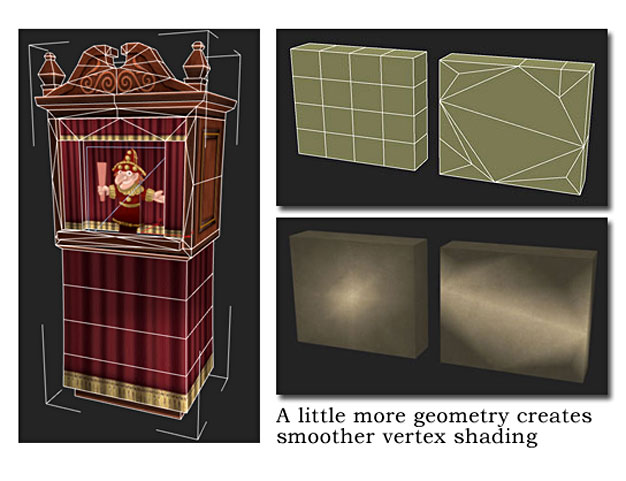
One other note. Vertex shading can get ugly fast if there is not enough geometry to help the transitions smoothly gradate across the surface of your model. To help alleviate this effect, I suggest you add just a little more geometry over large flat areas, and when in doubt use the blending tool to soften out any hard edges. It takes some time to get used to, but you will be happy at how much better your meshes look in the end. ~Don

Monday, May 5, 2008

Virtual 3D as Art

Howdy! Matt and I have been talking for a long time about creating a Blog that would allow us to rambled specifically about the “art” aspect of our jobs as the two art directors here at IMVU, inc. We are currently working on new and improved tutorials that will hopefully shed some light on the process of creating products for the IMVU Catalog. As part of that process we are developing a few pet projects that will act as the backdrop for a group of how-to articles that focus more on the “art” of creating 3D content. In the coming weeks we will be adding updates as we continue to fulfill our mandate to “inspire by example” and we look forward to your comments along the way. ~Don

And so it begins...

Hi everyone,

We have wanted to start this kind of blog for a while now but have had excuse after excuse. Well, no more excuses. Its time to actually converse with other people striving to express themselves as the new canvas of virtual worlds becomes a more accepted medium.

Although all are welcome, most people who check this blog out will no doubt already be at least a little involved in a virtual world be it as an employee or third party content creator. If you are not already involved in creating digital content of some form or another, then you will hopefully be inspired to give it a try. For all intents and purposes, it isn't *that* hard and every voice (especially at this wonderful, early stage) is welcome.

A little about Matt & Don:


Matt Danzig is cofounder of and senior Art Director at IMVU.com. Prior to starting IMVU, he was the kinetic art director at THERE.com (in charge of all things that moved including avatars, pets, and vehicles).

Before that, he was starving and ill-natured...even chicken jokes couldn't add light to the vast emptiness known as his life.


Don Carson is Art Director at IMVU.com. Prior to that, he was the senior Art Director at THERE.com. Don has worked extensively on all manner of virtual world projects as well as countless thousands of concept projects.

Matt says: "Don is the MAN. Listen to everything he says - he knows his poop."

While there are lots of things that are pretty cool about IMVU, the coolest thing, by far, is the Creator program (which is our baby - and the reason we work at IMVU in the first place.) This program allows anyone to create and sell virtual goods in the IMVU catalog.

Although there are obvious ties to IMVU.com, this blog isn't about IMVU, per se. Rather, it is about creating content for virtual spaces. The Do's and Don'ts, if you will. For example:
Do: make lots of chicken jokes
Don't: make steak jokes